In this tutorial we will discover how to draw a bewitching stylized portrait of Maleficent in Adobe Illustrator. We’ll be using various effects, such as Blur effect for soft shadows and overtones. Let the magic begin!
1. Trace the Sketch in Outline Mode
Step 1
Start by creating a New Document of 600x800 px size. File > Place your sketch onto the canvas and click twice on the layer containing the sketch. Check the Template tick box in order to lock the layer automatically and to make it more transparent (the Dim Images to option should be checked by default).

Step 2
Switch to the Outline Mode (Control-Y) to make your sketch visible under the shapes and lines we’ll be creating.
Grab the Ellipse Tool (L), make a circle and place it over the upper part of Maleficent's head. Draw out the jaw with the help of the Pen Tool (P). You can actually draw only left part of the jaw and then just use the Reflect Tool (O) to reflect it over the vertical axis and combine those two parts into a single smooth shape by selecting them both and pressing Control-J.

Step 3
Draw out the lips. You don't have to be super-precise at this step as you will be able to edit those shapes later, in process of coloring.

2. Create Maleficent’s Eyes
Step 1
Create an almond-like basic eye-shape with the help of the Pen Tool (P) or Pencil Tool (N). Add a few other details while remaining in the Outline Mode: a circle for the eyeball; a shadow from the upper eye-lid; an inner eye-corner and a shadow from the lower eye-lid. Don’t worry if the shapes are overlapping each other and seem to be out of the basic shape’s boundaries. Use the copy of the basic eye-shape to place all other objects in the Clipping Mask.

Place another shape, slightly larger than the basic eye-shape, on the bottom and fill it with black color to form the eyeliner.

Step 2
Turn back to normal Preview Mode (Control-Y) and start applying the colors to all the shapes we've made in our previous step. Switch the shadows from the eye-lids intoMultiply Blending Mode and fill them with a gentle linear gradient from light-grey to white.

Step 3
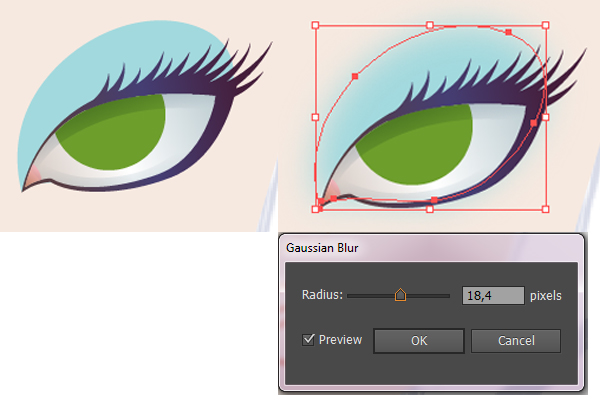
Let’s make a simple brush for separate eyelashes. Create a circle and drag it’s right anchor point farther right with the Direct Selection Tool (A). Convert the selected anchor point to corner by clicking it once with the Convert Anchor Point Tool (Shift-C). Finally, squash the shape a bit.

Drag the created shape to the Brushes panel and make an Art Brush, leave all the settings as default.

Step 4
Take the Paintbrush Tool (B) and try making a few strokes. You can make the Stroke value smaller or larger to your convenience. Draw the eyelashes, varying their length. Object > Expand Appearance and delete the unneeded pieces with the Eraser Tool (Shift-E). Select both the eyelashes and the eyeliner, Unite them in Pathfinder and apply a linear gradient from dark lilac to dark blue, creating a nice glowing makeup effect.